
MyTechDailyNews Software Bench: Emulating the 8-bit Apple II on a Raspberry Pi With LinApple
An emulator, not an apt package: that is the headline finding of this Software bench log, where a Raspberry Pi is rebuilt as a classic 8-bit Apple II. Nothing was finished for the last Maker Monday before Halloween, so the workshop slot went to source code instead of a costume — compile LinApple under Raspberry Pi OS, bend two lines of its settings file, boot a sample disk image, then prove the whole stack with a BASIC square that answers to W, A, S and D.
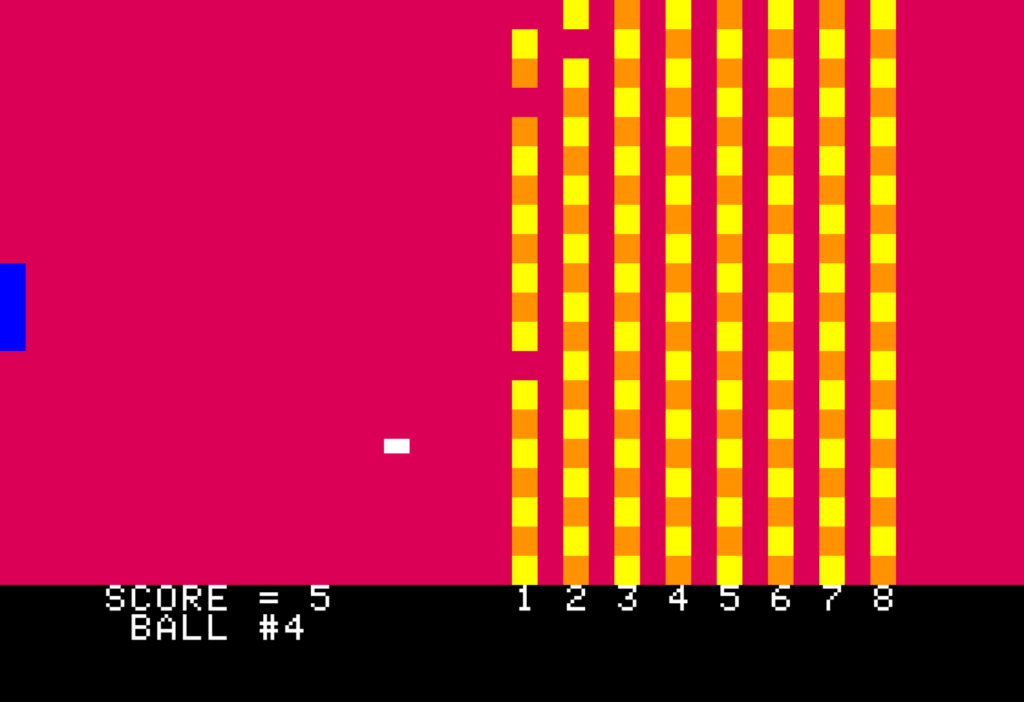 Playing a piece of computing history.
(10 points to the first reader who names the machine in that screenshot in the comments.)
Who this is for: retro-computing tinkerers who already run a Pi, IT support staff who have to build from source whenever there is no package to install, and anyone evaluating how much manual work a Linux emulator still asks of its user.
Why a machine from 1977 is still worth emulating
The Apple II was not the first home or personal computer, but it belonged to the iconic trio that arrived in 1977 next to the Commodore PET and the TRS-80.
It was not the most capable gaming computer of the 8-bit generation either, and yet games were still inside its design brief. Steve Wozniak drew on the Breakout arcade work he had done at Atari, and the fingerprints show: colour graphics, support for paddle controllers, and audio.
Audio was the thin end of the wedge, because anything more complex than a beep was quite CPU-intensive. Add-on boards such as the Mockingboard became popular and picked up support from a number of game developers.
The programming story splits in two dialects. Integer BASIC, Wozniak’s own version, supported only integer numeric data types; by eschewing floating-point numbers it processed them extremely fast, which made it less than ideal for certain programming tasks and fantastic for video games. It was supplied in the system ROM image. Applesoft BASIC, the more full-featured dialect, was originally supplied on cassette tape and only baked into the system ROM beginning with the Apple II Plus.
Which emulator to install: three options compared
| Option | Origin | Capability noted in the source | Pick it if… |
|---|---|---|---|
| AppleWin | The original project, created by Mike O’Brien | The code base that every fork tracks | you want to read upstream changes rather than install them here |
| LinApple | A fork of AppleWin; David Baucum (maxolasersquad) and several other contributors got it running on Linux | Can emulate Apple II sound cards such as the Mockingboard, enabled by default in the configuration file | you want the guided Raspberry Pi route, and you are willing to compile it yourself because it is not in the Raspberry Pi OS apt repository |
| audetto’s fork | A fork of AppleWin, regularly synchronised with the original AppleWin GitHub repository | Tracks AppleWin features more closely | feature parity with upstream matters more to you than following a worked example |
Bench verdict: LinApple. It is the option with documented sound-card emulation, a Linux build path, and a tutorial already written for the Pi. The audetto fork stays on the watchlist for anyone who cares about upstream features landing sooner.
Before you start: permissions, files and privacy notes
- sudo is part of the job. The package update, the full-upgrade, the dependency install and the final install step all use sudo, and you may be prompted for your password when you run the commands that use sudo.
- You are installing system-wide. The compiled emulator lands under the /usr/local folder, so this is not a self-contained per-user build — worth factoring in if you maintain several Raspberry Pi OS machines.
- One network fetch. The only download in the sequence is the git clone of the linapple repository from GitHub; check the URL before you run it and treat the source as third-party code.
- Small writable footprint. Everything you change afterwards sits in directories you own: ~/.config/linapple/ for linapple.conf and ~/.linapple/disks/ for disk images such as Master.dsk.
- Input grab is real. The emulator can take control of your mouse; press F1 to release it, which displays the help screen, and press F1 again to turn it off. Learn the escape key before launching in a shared session.
Step by step: compile and install LinApple on Raspberry Pi OS
- Open a Terminal window. This is where you install dependencies, download the source code, compile it, then install it.
- Refresh your operating system packages and pull in the build dependencies.
$ sudo apt update
$ sudo apt -y full-upgrade
$ sudo apt -y install git g++ cmake libzip-dev libsdl3-dev libsdl3-image-dev libcurl4-openssl-dev zlib1g-dev imagemagick - Choose a working directory if you want one. If you would prefer not to check the source code out into the root of your home directory, run mkdir ~/src to create a src directory under your home directory, then cd ~/src to change into it.
- Clone the repository.
$ git clone https://github.com/linappleii/linapple.git
- Prepare and build. cd into the linapple folder, then:
$ cd linapple
The first cmake command prepares the source code and the second compiles it. The -j4 argument tells cmake to use as many as four CPU cores.
$ cmake -B build -DBUILD_TESTING=OFF
$ cmake --build build -j4 - Install it.
$ sudo cmake --install build
Once that finishes, the command linapple runs the emulator from any Terminal window. - Copy the default configuration file and the sample disk image into your home directory. A couple of directories have to exist before you copy files into them:
$ mkdir -p ~/.config/linapple/
$ cp /usr/local/etc/linapple/linapple.conf ~/.config/linapple/
$ mkdir -p ~/.linapple/disks/
$ cp /usr/local/share/linapple/Master.dsk ~/.linapple/disks/ - Open the file with your favourite editor.
$ nano ~/.config/linapple/linapple.conf
- Boot the sample disk.
$ linapple --autoboot --d1 ~/.linapple/disks/Master.dsk
The two configuration lines worth changing first
| Setting | As shipped | Change to | What you notice |
|---|---|---|---|
| Joystick 0 | 2 | 4 | Your mouse becomes a joystick, which you will either love or hate — give it a try in Brickout later. The configuration file describes the other options you can choose. |
| Screen factor | 1.0 | 2.5 | The emulator window is a bit bigger. |
| Mockingboard | Enabled by default in the configuration file | leave as is | Sound-card emulation for titles that use it. |
Save and exit after editing. In nano, press CTRL+X, answer Y for yes, then press ENTER to confirm the file name.
First boot: the screen you should get, and the keys that save you
Run the boot command and LinApple should open and display the screen shown in Figure 1. If the emulator has taken over your mouse, F1 releases it; F6 toggles full-screen mode.
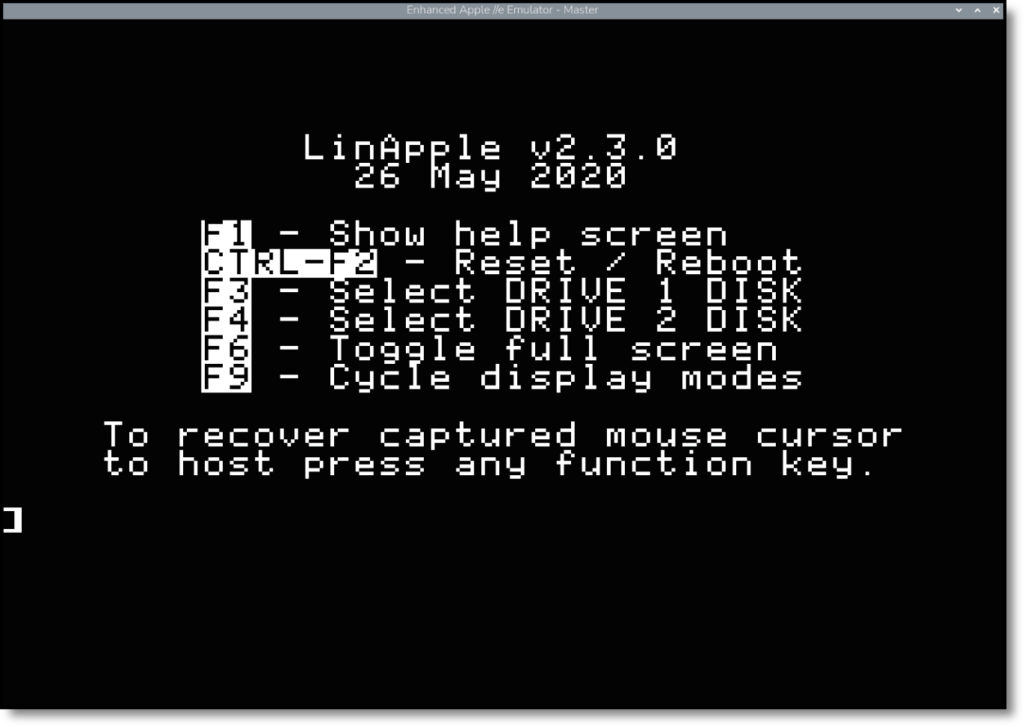 Figure 1: LinApple is up and running
Type-in demo: a BASIC square you drive with W, A, S, D
Two routes to the demo: type the listing straight into the emulator, or find it in the ch03/AppleIIBasicPrograms.dsk file in the GitHub repository. For the disk image route, launch the emulator with linapple --autoboot --d1 AppleIIBasicPrograms.dsk, type LOAD BLOCKMOVE at the ] prompt and press ENTER, then type RUN and press ENTER.
10 HGR
20 X = 140: Y = 80: D = 3: REM INITIALISE
30 HCOLOR = 3: GOSUB 1000: REM DRAW CUBE
40 REM WAIT FOR AND READ KEYPRESS
50 K = PEEK (- 16384): IF K < 128 THEN 40
60 REM CLEAR STROBE
70 POKE - 16368, 0: K$ = CHR$ (K - 128)
80 HCOLOR = 0: GOSUB 1000: REM ERASE CUBE
90 IF K$ = "W" THEN Y = Y - D
100 IF K$ = "S" THEN Y = Y + D
110 IF K$ = "A" THEN X = X - D
120 IF K$ = "D" THEN X = X + D
130 IF X < 0 THEN X = 0
140 IF X > 272 THEN X = 272
150 IF Y < 0 THEN Y = 0
160 IF Y > 184 THEN Y = 184
170 GOTO 30 : REM BACK TO TOP OF LOOP
1000 REM DRAW CUBE IN CURRENT HCOLOR
1010 HPLOT X, Y TO X + 8, Y TO X + 8, Y + 8 TO X, Y + 8 TO X, Y
1020 RETURN
Read it as a loop rather than a program. Line 20 defines the starting X and Y position plus the number of pixels the square moves each time (the variable D, set to 3). Line 30 sets the drawing colour to 3 and calls the subroutine at line 1000 to draw the cube, which is built from HPLOT lines 8 pixels long. Lines 40 to 70 wait for a key press, clear the keyboard strobe — a bit of hardware that indicates when a key press has been read — and convert the integer key value (K) into a string (K$) holding the character typed. Lines 80 to 120 erase the cube and shift X or Y according to W, S, A or D. Lines 130 to 160 make sure the square has not run off-screen, clamping X between 0 and 272 and Y between 0 and 184, and line 170 jumps back to the top of the loop.
Once the program is entered, type RUN and press ENTER, move the square with the WASD keys, then press CTRL+C when you are done to exit it.
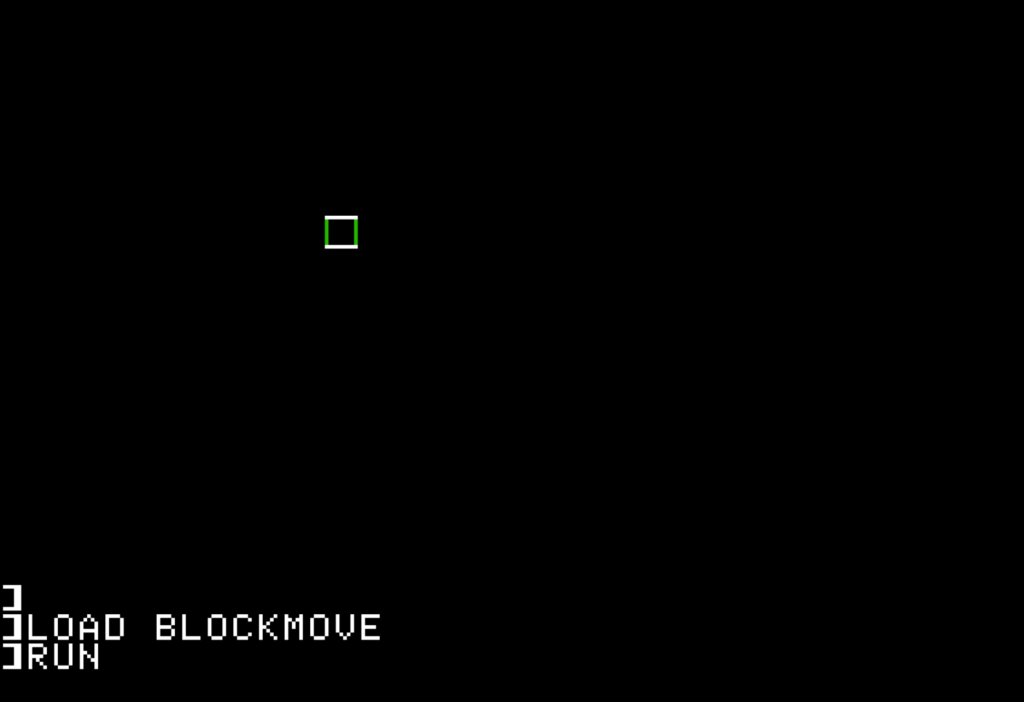 Figure 2: Moving a simple object around your screen
Notice that the vertical and horizontal lines are different colours, and that the vertical lines change colour as you move. That behaviour comes from the way Apple II graphics work: the machine only generates a monochrome display signal, but uses signalling tricks to generate colour artefacts, and game programmers manipulated those artefacts to create the colour combinations they wanted. Nothing here is a LinApple defect.
After you run a graphical program you are left with a small text area below the graphics mode portion of the emulator screen. Type TEXT and press ENTER to return to text-only mode.
Seven commands to keep in your pocket
- LIST — lists all the lines of the current BASIC program.
- RUN — runs the current program.
- NEW — erases the current program and lets you start afresh.
- CATALOG — lists all files on the disk image.
- SAVE NAME — saves the current BASIC program under whatever file name you specify.
- LOAD NAME — loads the program with the specified file name.
- CTRL+C — stops a running BASIC program.
Apart from CATALOG, these commands only apply to BASIC programs; many games are binary executable files that do not include BASIC source, so CATALOG is how you see what a disk image actually holds.
For extra typing practice, Lee Fastenau’s collection of short programs is a good follow-up. Lee’s programs are intentionally dense, as most are designed to be entered on one or two lines of code, so take your time typing them in.
Common mistakes worth avoiding
- Searching the Raspberry Pi OS apt repository for LinApple. It is not available there, so compiling is the install path.
- Dropping any name from the dependency list — git, g++, cmake, libzip-dev, libsdl3-dev, libsdl3-image-dev, libcurl4-openssl-dev, zlib1g-dev, imagemagick — since they are all installed as the dependencies needed to compile LinApple.
- Cloning into the root of your home directory and then losing the linapple folder; make a src directory on purpose.
- Reading -j4 as mandatory. It only tells cmake to use as many as four CPU cores.
- Launching without knowing the escape keys: F1 for the grabbed mouse and help screen, F6 for full-screen mode.
- Assuming the sample disk is your library: personal disk images belong in ~/.linapple/disks/.
- Expecting CATALOG to make a game runnable, when many games are binary files with no BASIC source.
- Rushing the dense one- or two-line type-ins from Lee Fastenau.
FAQ
Q: What does the install sequence actually require of my system?
A: Raspberry Pi OS with the listed development packages, a clone of the linapple repository from GitHub, a cmake build, and a sudo install step that writes under /usr/local. The sample configuration file and the Master.dsk disk image come with the install and are copied into your home directory.
Q: Can I make the window bigger without leaving the emulator?
A: Size comes from the Screen factor line in linapple.conf — the guide changes 1.0 to 2.5 — while F6 switches full-screen mode on and off at runtime.
Q: Will sound-card titles work?
A: LinApple can emulate Apple II sound cards such as the Mockingboard, and that option is enabled by default in the configuration file.
Q: A program is looping and I want control back.
A: Press CTRL+C to stop a running BASIC program; if the emulator itself has your mouse, F1 releases it.
Q: Why do the cube’s edges flicker between colours?
A: That is colour artefacting from the Apple II’s monochrome display signal, not an emulation error — the original machine produced colour through those signalling tricks.
Q: Is there a longer version of this walkthrough?
A: It sits inside a series of emulation guides in The Raspberry Pi Guide to Retro Gaming, and the same guide is referenced in the latest issue of Raspberry Pi Official Magazine.
Action plan for a clean first run
- Build once, verify twice: after sudo cmake --install build, boot Master.dsk before editing anything, so you know the baseline works.
- Make the two config edits — Joystick 0 from 2 to 4, and Screen factor from 1.0 to 2.5 — then judge the mouse-as-joystick choice in Brickout rather than in the text screen.
- Load BLOCKMOVE from ch03/AppleIIBasicPrograms.dsk and type it in once more by hand; the pair of routes teaches LOAD, RUN and CATALOG in a single sitting.
- Keep one personal disk folder at ~/.linapple/disks/ so your --d1 paths stay predictable.
- If you support other people’s Pi machines, script the dependency, clone, build and install commands and keep a copy of your edited linapple.conf for reuse.
- Watch the audetto fork if you want AppleWin features to reach your build sooner.
Figures and sources behind this bench log
| Data point | Value | Where it comes from |
|---|---|---|
| Year of the 8-bit trio | 1977 — Apple II, Commodore PET, TRS-80 | Historical framing in the guide |
| Numeric types in Integer BASIC | Integers only, no floating-point | System ROM description |
| Applesoft BASIC in ROM | From the Apple II Plus onward | Originally supplied on cassette tape |
| Build parallelism | Up to four CPU cores with -j4 | cmake --build step |
| Window scale | 1.0 changed to 2.5 | linapple.conf |
| Mouse as joystick | Joystick 0 changed from 2 to 4 | linapple.conf |
| Cube start position | X = 140, Y = 80 | BLOCKMOVE listing |
| Movement step | D = 3 pixels | BLOCKMOVE listing |
| Screen clamp | X up to 272, Y up to 184 | BLOCKMOVE listing |
| Cube edge length | 8 pixels | HPLOT subroutine at line 1000 |
| Key-read threshold and offset | 128 | Lines 50 and 70 |
| Introductory price of the source guide | £9.99 | Raspberry Pi Press |
The procedure above follows The Raspberry Pi Guide to Retro Gaming, a guide on how to play your favourite games of yesteryear on a Raspberry Pi; it is also referenced in the latest issue of Raspberry Pi Official Magazine, and the introductory price of £9.99 is from Raspberry Pi Press.
Filed by Sarah Chen for the MyTechDailyNews Software desk, published by Tech Daily. If your LinApple build behaves differently — a dependency that needs naming, a config line that changed the experience — send the details to hello@techdaily.com and we will test it on the bench for the next revision.